We restored a RULA-6 made in Soviet-era Estonia (English summary)
This is a summary post of the blog in English, with some new content added to the history part. The rest of the rebuild blog is in Estonian, but you can easily Google Translate.
Skateboarding in USSR
Skateboarding existed in Soviet Union, just like it did in the rest of the world. The first boards were self-made, but towards the end of 1970s production started. There's a good article about it in The Calvert Journal https://www.calvertjournal.com/articles/show/7882/skateboarding-ussr-soviet-skating. Also, there's a Soviet Skateboarding Museum in Belarus:
- story about the museum in Jenkem Magazine http://www.jenkemmag.com/home/2020/06/09/check-one-soviet-skateboarding-museum/
- webpage of the museum itself https://www.minsk8.com/museum
- FB page of the founder, lots of pictures https://www.facebook.com/gleb.bentsiovski
Producing Skateboards in Soviet-occupied Estonia
In 1978 the chief engineer of Võru Gas Sensor Factory, situated in Societ-occupied Estonia, was travelling in France and saw second-generation skateboarders. He immediately took to the activity and after returing to Estonia, initiated the creation of the Estonian skateboard. The decks were produced in another town, Pärnu, in a ski- and furniture producing factory Viisnurk. Gas Sensor Factory designed and produced the trucks and wheels. First boards were made in 1978 and given to a group of young skiiers in Pärnu to test our. Based on their feedback, several iterations were made before submitting the skateboard to a 1979 product innovation competition, held in preparation for the 1980 Moscow Olympics. Called RULA (abbreviation of the words ROlling BOard in Estonian), the product was accepted and production commenced in 1979. RULA-5 and RULA-6 were the most produced versions. Here's an example of a restored RULA 5 (modern wheels), that came with a faux leather bag(!).

Here's probably one of the oldest RULAs produced in Estonia. It belongs to Varje Tipp, one of the original testers of RULA and a several-time winner of skateboarding competitions of the time. This "Golden RULA" is a trophy for winning one of those competitions.

My RULA-6
I received my RULA-6 as a birthday present from my grandparents :) in the end of 1980s. Price tag is pressed into the bottom of the deck and reads 35 roubles, which was not inexpensive considering wages at the time. I had no idea how to ride it, had never seen anyone skateboard before and the instructions that came with it were written and rudimentary. Like many other early skateboarders in Estonia, I had to step on and make it up. Riding it up and down well-paved village streets, it was a head-turner, not many people had seen skateboarding at the time. With it's raised deck and soft trucks, RULA was excellent for slalom and cruising, but too heavy for tricks. Only later I have learned, that in fact some tricks were possible, like riding on your hands, but I never learned any of them.
In 1996 or thereabouts I placed my RULA in the basement of my parents' house and there it stood for 25 years, gathering dust. My mother usually does not like useless things lying around and gets rid of them quite quickly, except I had inadvertently placed RULA in an out-of-sight location. The basement was dry and heated, helping preserve the plywood deck and other parts.
In the spring of 2021, my son Mathias (8) asked me about skateboarding and he happened to do it, while we were visiting at my parents' place. So I just casually went down to the basement and took the RULA from exactly the same spot, where I had placed it 25 years earlier. I'm quite sure it had not moved an inch in that time, since my parents were completely surprised by it. We wiped away the dust and it looked to be in a good enough shape, that we started talking about restoring it. We do these little restoration projects with Mathias, but it's mostly been old toy cars and such. Here's what my RULA-6 looked like after the dust had been wiped.

And here's what it looked like, after my daughter (6) had stepped on it and rode it for no more then 3 or 4 meters. The wheels and other rubber parts just literally fell into small pieces.

Restoration plans
At this point I contacted a number of people. One of them was Varje Tipp, one of the very first people to test the RULA in 1978 and currently the deputy meer of Pärnu. She quickly responded on Facebook and it turned out, that rubber parts deteriorating, especially black rubber parts, was common among older RULAs. She was also kind enough to share some stories of the early days and send photos of her collection of RULAs. Some other people contacted at this point, like Mikk Andresen, became permanent members of the restoration team.
Broadly speaking, our choice was between modifying the trucks to accommodate modern longboard wheels or recreating the original wheels. We decided to try and recreate the originals.
We also took the RULA apart and created a complete parts list with measurements (in this post). Some of our fans and friends also contributed measurements from their own RULAs, that we were unable to obtain due to broken parts.
Overall, the project took 2 months (May 16 - July 9), had 3 people in production team and many more as consultants, fans and supporters, cost 87 euros in parts and materials and was a fun time spent learning with my son and our friends.
Casting the wheels, cleaning the trucks and restoring the deck
Here's a list of everything we did during the project:
- Learning about the history of RULA and contacting people who created it.
- Planning the project
- Disassembling the RULA
- Photographing, measuring, naming and catalogueing the parts
- 3D modelling the broken parts (wheels, break pads)
- 3D modelling casting molds, based off of 3D modelled parts
- 3D printing the casting molds
- Purchasing materials necessary for casting
- Cleaning metal and plastic parts (incl. trucks and hangers)
- Chrome-painting nuts, bolts, washers and other small parts
- Ordering materials necessary for gripping the deck
- Ordering materials for restoring the deck
- Creating a 2D drawing of the deck layout (download SVG / PDF)
- Printing and cutting deck layout out of paper
- Preparing a test deck
- Painting the test deck
- Grinding down black sand and glueing it to test deck
- Testcutting grip tape and attaching it to test deck
- Preparing supplies for casting
- Casting wheels and break pads
- Sanding the deck
- Applying putty to deck
- Applying base coat to deck
- Sanding, spray painting and testing the wheels
- Spray-painting the deck (3 coats)
- Purchasing lacquers for deck
- Cutting out full deck layout from grip tape
- Clear coating the deck (4 coats on top, 3 on the bottom)
- Attaching the grip tape
- Reassembling the RULA
The most crucial part of the project was the casting. It took a number of iterations and quite some coaching from Mikk to get the 3D designs of the molds right, so that no air gets trapped anywhere, that the cast parts can be demolded without damage etc. All of the 3D designs, both RULA components as well as molds for them, can now be found on Thingiverse https://www.thingiverse.com/thing:4904472. Wheel molds are 3-piece, break pad mold is 1-piece. We tried using release agent, but it had little effect. Instead, we smeared or poured liquid cadle wax on the insides of the molds, then cut off the excess with a thin putty knife. This leaves the surfaces of the cast parts smooth, hiding the 3D printing lines, and is excellent for demolding. Here's another post I found about casting longboard wheels, where plaster mold was used instead of a 3D-printed mold https://www.instructables.com/Diy-Resin-Cast-Skateboard-Wheels/
We used Xencast PX 90 2-component polyurethane resin for casting. We had quite a bit of debate about the right softness of the wheels, but riding the board now, I can confirm, that 90 Shore A is perfect for cruising. Ordering it from EasyComposites https://www.easycomposites.co.uk/xencast-px90-semi-flexible-polyurethane-casting-resin was a breeze. Delivery, despite their Brexit warnings, took just a few days and the price per wheel was very reasonable. Mikk already had the black PU pigment, which we only needed a tiny bit of. Here's all the materials and tools for casting laid out on the table:

Here's a video of casting skateboard / longboard wheels out of polyurethane resin. There's commentary in Estonian, but most of it is pretty self-explanatory. Weight numbers on the scales were calculated based on volume of the mold and density of the resin. We prepared 143 g of resin per wheel (70 g of component A, 70 g of component B and 2,6 g of black pigment). We recommend preparing a little more, it later seemed like at the very bottom of the cup the resin was not perfectly mixed and left some unhardener stripes on the wheels. So preparing 155-160 g of resin per wheel is recommended. The rest of our lessons learned you can Google Translate from this post.
Here's a first test of the wheels and a closeup of the problematic unhardened stripes:
The problems, however, are cosmetic, not structural. We will recast one wheel at some point and also the break pad, because we forgot to insert the steel reinforcement into it when casting. However, even without the recasting, Mathias is riding on the board somewhere outside as I'm writing this post. I did some riding myself yesterday and it was smooth. No ball bearings have been replaced and only one needed some cleaning, the rest of them are rolling perfectly.
Restoring the deck was fairly basic woodworking. It took a bit of figuring to find the right color-lacquer combination. We went with one layer of Maxi Color white spray base coat, 3 layers of Maxi Color RAL 6002 Leaf Green spray paint, 3 layers of Tikkurila Unica Super 20 weather-proof lacquer and on the top side of the deck a final Maxi Color spray matt clear coat. It's too early to say, how well this will last. It might have been a better idea to use some clear 2-component resin instead, as we saw people do in some Youtube videos, because already on the first day of serious riding the RULA took a bit of paint damage on the forward edge.
We used regular grip tape on top of the deck, to recreate the original design. We first printed the design onto 3 sheets of A4 paper in mirrored mode. We taped the 3 sheets together, making sure that lines are straight and overall lenght is correct. Then Mathias used sharp scissors to cut out the parts where griptape needs to go. Next, we took the paper cutout and placed it on the back of griptape, We traced outlines of the parts from the paper to the back of griptape and then, with a sharp retractable utility knife, cut out the parts from griptape.

We also tried purchasing black sand, grinding it down to size and glueing it to our test deck. This came out looking quite good, but after kids had jumped and danced on the test deck for a while, a lot of the sand came loose. Griptape right next to the glued sand showed no sign of wear at all, so we went with griptape. We tested the glued sand approach, because that's what they appear to have done for the original RULA. When you look at our finished rebuild closely, you can see, that not all the lines are perfectly straight. To achieve a better result, we suggest laser cutting the griptape, but for our purposes, hand cutting with a knife and a ruler was good enough.
Here's what a new RULA-6 looked like off the production line (photo from the Estonian Sports Museum):
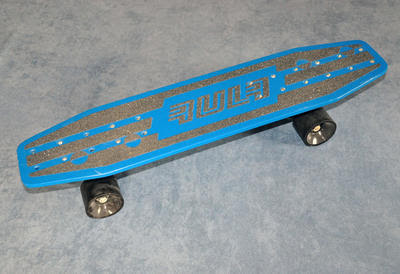
And here's what our RULA-6 looked like, when we were done restoring it (click to enlarge):

Here's a before and after photo of our Estonian-made RULA-6, originally produced somewhere around 1987.

Comments
Post a Comment